Third workflow in the PDA-redesign series, after Cycle Counts and Manage Product Locations. Putaways now has a phone-shaped twin at /pda/inventory/putaways/* with the full operator flow — list → process → summary — and the auto-route plumbing that came in with Cycle Counts means you don't have to think about which URL to use.
The Home List
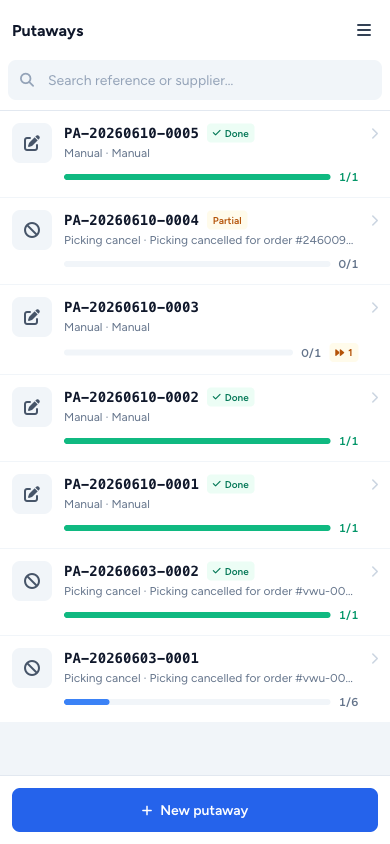
The PDA index is the same pattern as Cycle Counts: full-width tap rows, each one its own card. Each row carries:
- A source icon on the left so you can tell what kicked the putaway off at a glance — Purchase Order, Returns, Manual, or a cancelled Picking session
- The reference number on top, the source label and assignee underneath
- A blue progress bar with
done / totalitems beneath - A small amber Partial chip when a putaway was submitted with unresolved items still on it
Search the reference field at the top, and a sticky + New putaway button at the bottom for users with the manage permission.
The Process Screen — Scan, Place, Move On
This is where the work gets done. Open a putaway and the screen lays out as three sticky bands:
- Sticky progress header — back arrow + putaway reference +
N of M placedcounter - Scan bar —
inputmode=none+ keyboard toggle + auto-focus + clear, same pattern as Cycle Counts. Hardware scanners drop barcodes straight in - Item list — full-width rows showing the
From → Destinationflow with a violet "from" pill and an emerald "destination" pill (once you've placed it)
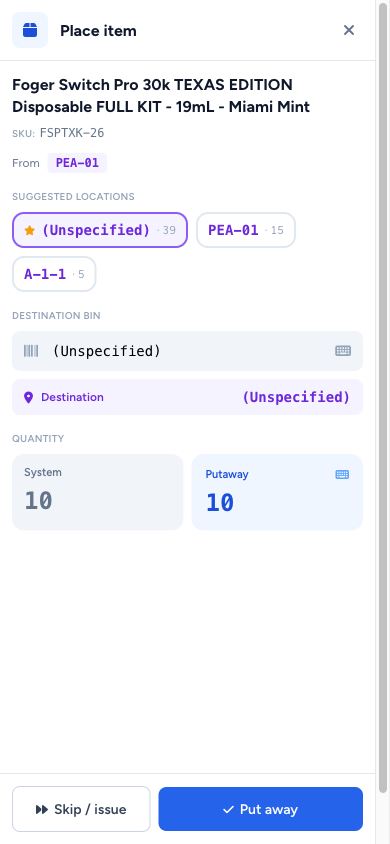
The instant you scan an item — or tap the row — the Place sheet slides up over the screen.
Suggested Destination Bins, Already Sorted
The Place sheet shows you the bins this product is already in, sorted by on-hand quantity descending. The most populated one is marked with a primary star — the suggestion. Tap any chip to commit it as the destination, or scan a different bin if you want to put it somewhere else.
A side-by-side System Quantity / Putaway Quantity panel reads off what's in the bin already vs. how much you're adding. Tap the Putaway Quantity number and a centered numeric keypad floats up on top of the Place sheet — big tap targets, no fighting the soft keyboard.
Skipping Items Is a First-Class Action
Can't put it away? Tap Skip and pick a reason:
- Damaged
- Wrong product
- No suitable bin
- Other
The row gets an amber Skipped chip with the reason text. You can complete the putaway with skipped items still in it — the confirmation pops an amber warning that the submission is partial.
The Create Flow — Manual Putaways
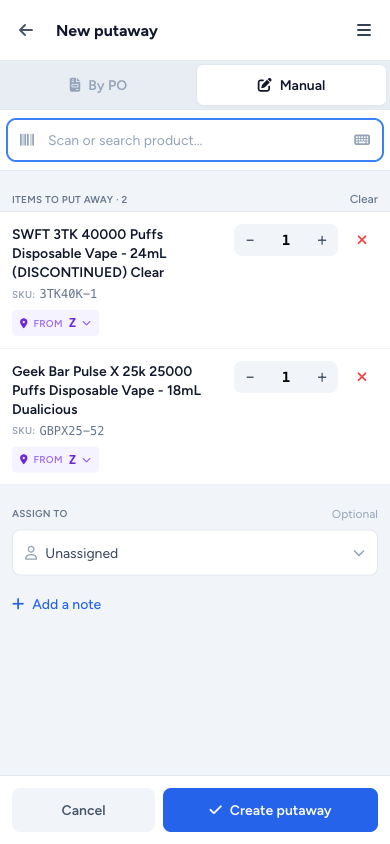
For manual putaways, the create screen mirrors the cycle-count create:
- Segmented By PO / Manual toggle at the top — By PO is disabled because those are created automatically when you receive a PO
- Scan or search to add a product → selected products gather in a list below
- Each row has ± qty steppers with a tap-to-keypad fallback (the buttons are too small on a PDA to do bulk changes; tapping the number itself opens the full keypad)
- A From pill on every row defaulting to
Z— tap it to pick a different source bin - Bottom sheet for Assign-To + a Notes textarea
- Sticky Cancel / Create at the bottom
When the system suggests a destination bin, the suggestion now correctly excludes the actual source bin you picked, instead of always assuming source = Z. So if you're putting away out of B-2-3, the system won't suggest B-2-3 back to you.
Once It's Submitted
Revisiting a completed or partial putaway hides the scan bar entirely — there's nothing more to do — and the bottom CTA becomes a View summary link instead of Complete. The summary itself is a compact one-band header with the count chips, followed by the item list showing each row's destination bin or skip reason.