Fourth and final workflow in the PDA-redesign series for now. Replenishments — the daily routine of topping up pick-face bins from reserve / bulk storage — now has its own thumb-zone twin with a flow purpose-built for the scan-out-of-bulk → scan-into-pick pattern.
The Home List — At a Glance Status
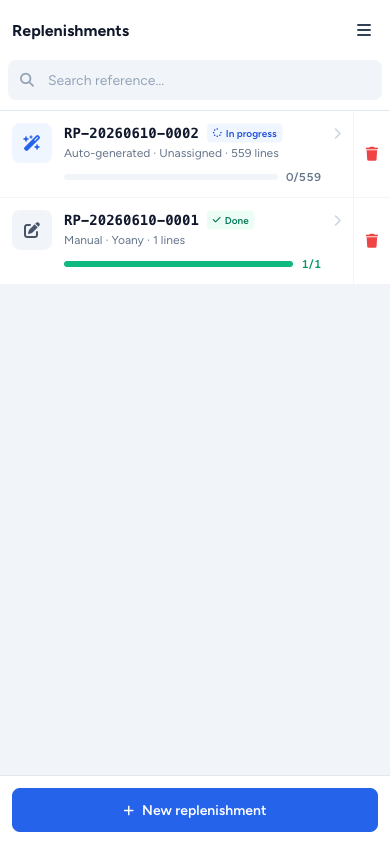
Same shape as the other PDA index pages. Each row is a full-width tap target with:
- A source icon — sparkle wand for Auto-generated, pen-square for Manual
- The reference number on top, then a row of small status chips (In progress / Partial / Done)
- A subtitle line: source · who's working on it · line count. Who's working on it falls back to whoever last picked an item if the task is in progress with no assignee, instead of the dead "Unassigned" you used to see for active work
- A blue (in-progress) or emerald (done) progress bar with
done / total - A small amber skipped chip when items were skipped — fast-forward icon + count
- A red trash button on the right edge (managers only) that confirms via SweetAlert before deleting
Sticky + New replenishment CTA at the bottom for managers.
The Process Screen — Two-Stage Guided Move
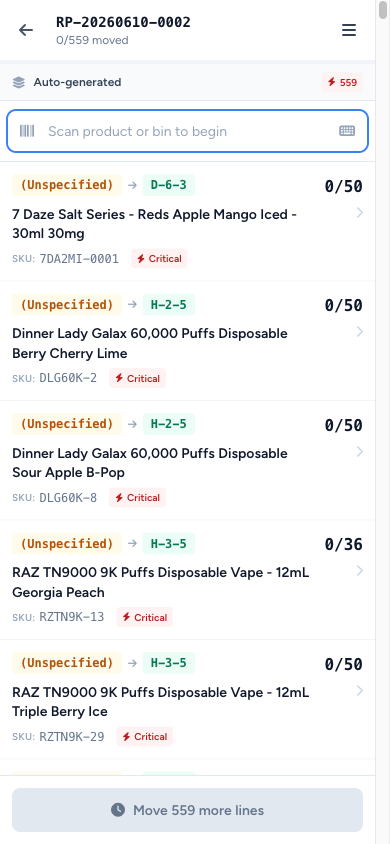
The detail page is built around the two-stage Move sheet, which is the change that makes this workflow click on a phone.
Each row shows the bulk bin → pick-face flow with:
- A violet PEA bin pill on the left (where it lives)
- An arrow
- An emerald pick-face pill on the right (where it's going)
- A small Critical or Below min chip if the pick-face is out of stock or under the configured minimum
Scan an item or tap a row and the Move sheet slides up.
Stage 1 — Pick From Bulk (Amber)
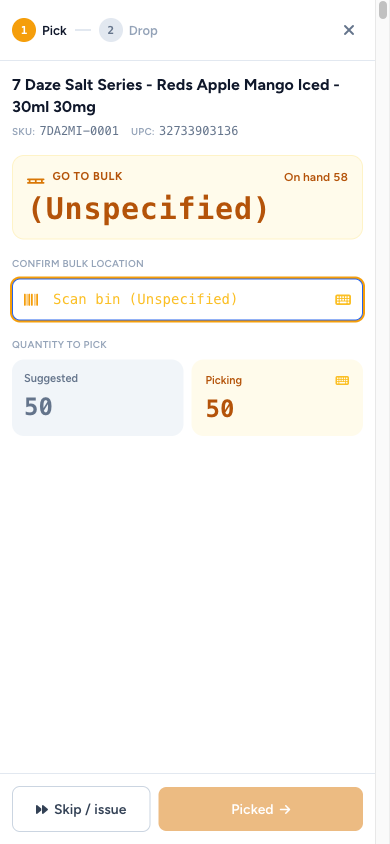
The Move sheet's stepper opens at ① Pick from bulk with everything in amber — chips, scan input, qty panel, the Done button. The system shows you the bin you should pick from. You have to scan that bulk bin's barcode to confirm — no shortcuts, no "I know what I'm doing" override. If you scan the wrong bin, the input shakes and stays on stage 1.
The Putaway Qty panel reads off bulk on-hand and the suggested quantity. Tap the number → a centered numeric keypad floats on top of the sheet with Suggested and Max quick-fills, and the Done button is greyed out if you exceed Max (no over-allocation past what's actually in bulk).
Stage 2 — Drop at Pick-Face (Emerald)
Confirm stage 1 and the sheet's whole palette flips from amber to emerald — chips, scan input, Done button. Same strict-scan pattern: scan the pick-face barcode to confirm you actually walked there, then commit. A side-by-side panel shows the pick-face's current quantity vs. the configured min/max so you can sanity-check what you're about to drop.
The tone change between stages 1 and 2 isn't decorative — it's there so when you glance down at the screen mid-walk, the colour tells you which half of the job you're on.
Skip Has Its Own Reason List
If you can't complete the move, Skip opens a sheet with five reasons:
- Bulk short
- Bulk empty
- Pick-face full
- Damaged
- Other
The row gets an amber Skipped chip with the reason. You can still submit the replenishment with skips — the SweetAlert confirmation pops an amber warning that the submission will be partial.
Create Flow — Auto-Generate, or Pick Your Own
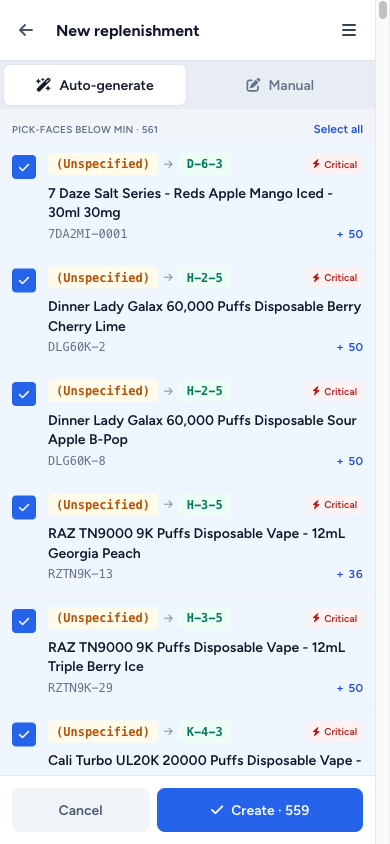
The create screen offers two modes via a segmented toggle:
Auto-Generate
The system scans every pick-face bin in the warehouse and lists the ones currently below their configured minimum. Each one is a checkbox row showing the bin, the product, the current on-hand, and the target. Out-of-stock pick-faces (critical) are pre-selected so you don't have to remember to tick them. Adjust the selection, tap Generate, and only those pick-faces get rolled into the new replenishment.
Manual
Scan or search a product and it lands on a row with auto-derived defaults — the most-stocked bulk bin as source, the configured pick-face as destination, the suggested qty in the middle. ± qty steppers with a tap-to-keypad fallback for bigger changes. Remove button per row.
Both modes share the same Cancel / Create CTA pair at the bottom and the same bottom sheet for Assign-To.
Once It's Submitted
Just like Putaways, revisiting a completed or partial replenishment hides the scan bar entirely and turns the bottom CTA into a View summary link. The summary itself is a compact one-band header with the count chips, followed by the item list with each row's pick-face destination or skip reason.