Move Product was one of the few warehouse workflows still tying operators to a desktop. This release fixes that with a phone-shaped twin that auto-routes from any narrow viewport, plus a matching UPC editor so you can fix a missing barcode mid-move without leaving your scanner. A small notification cleanup tags along.
Move Product on the PDA
Open /inventory/products/move on a PDA scanner or shrink your desktop browser narrow enough and you're now routed to a thumb-first twin. The flow is three states, not three pages — each blends into the next:
Find the Product
A sticky scan/search bar drops you straight into live results as you type. Matches come from name, SKU, UPC, case UPC, case SKU, pack SKU, or pack UPC — anything that could be on a label. Each result is a full-width tap row showing the product, its SKU/UPC, and total on-hand. Hardware scanners drop straight in; the keyboard icon flips on a soft keyboard when you need to type by hand.
Inspect the Product
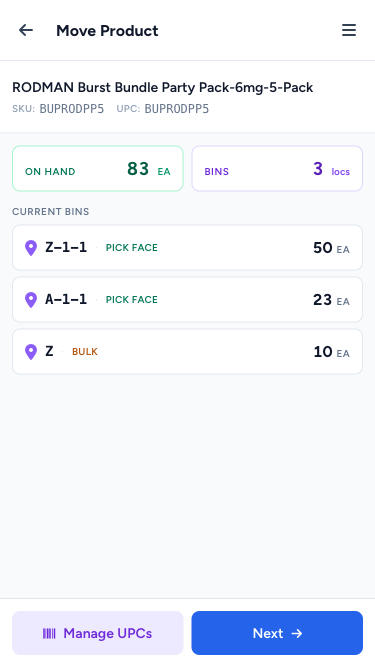
Tap a result and you land on a waypoint card before any move starts. Up top:
- On Hand · Bins — a compact KPI strip with the totals
- Current bins — one card per bin, single line, with the location code, type (Pick face / Bulk / Staging), and quantity right-aligned
- Manage UPCs and Next — two side-by-side sticky buttons so you can either fix the product's barcode (more on that below) or proceed to the move
Pick From → Drop At
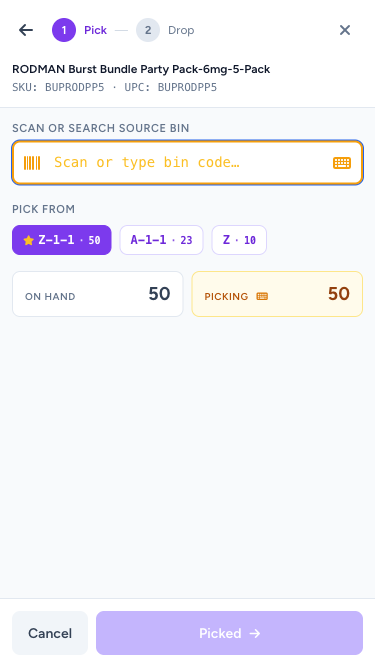
Tap Next and the Move sheet slides up. Stage 1 is violet and titled Pick. You scan or pick the source bin; the system also surfaces the bins this SKU already lives in as quick-tap chips with their on-hand badge. The picking quantity defaults to what the system has on that bin — tap the Picking tile to override it through a centered numeric keypad if you're fixing inventory mid-move.
Strict-scan confirmation is the rule: scanning the wrong bin code shakes the input and keeps you on Stage 1. Typing a bin code that doesn't exist anywhere in the catalogue prompts you for the type (Pick face / Bulk / Staging) and creates it on save — no more "where do I add a new bin first" detour.
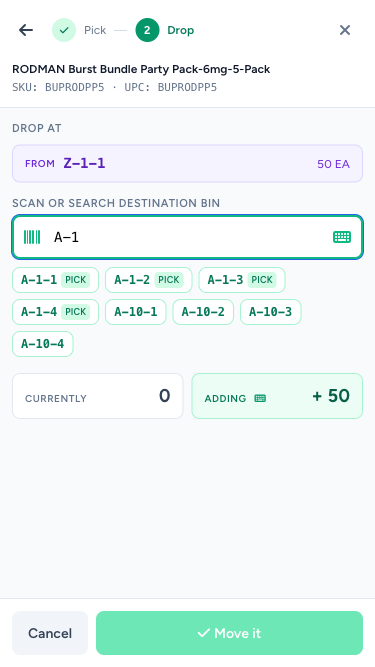
Confirm and the sheet flips to emerald Stage 2 — Drop. Same live bin search, same new-bin type picker, plus a side-by-side panel showing the destination's current quantity vs. what you're adding. Tap Move it to commit.
Back Buttons That Actually Work
Every step has its own back arrow that preserves state. The product card → search keeps your prior search list intact. Stage 1 → product card keeps your source pick. Stage 2 → Stage 1 keeps your qty + source. Manage UPCs → product card keeps the product loaded so you don't have to re-find it.
One Less Place You Need to Be at a Desk
When you create a new source or destination bin on the fly, the system files it under the type you picked. When you scan a bin the system shows as empty but actually has stock, the move still goes through — Move Product is now a legitimate inventory-fix tool, not just a transfer tool.
Manage UPCs on the PDA
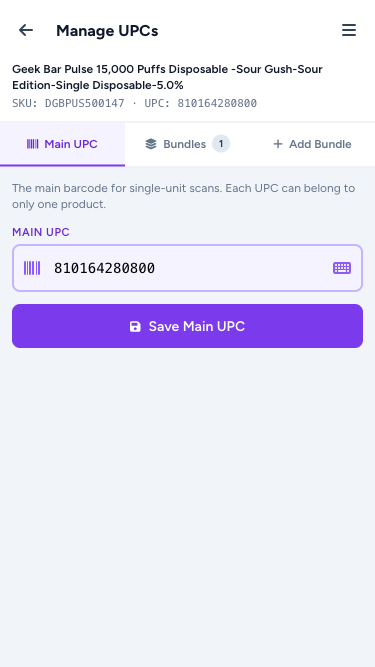
The per-product UPC editor got its own PDA twin. Reached from the Manage UPCs button on the Move Product card (and from any future PDA flow that needs it), the page has three tabs — Main UPC, Bundles, and Add Bundle.
Every input on every tab gets the standard PDA scan/keyboard pattern: hardware scanners drop straight in, a keyboard icon flips to manual typing when you need it, and the input is bordered + tinted so you can find it at a glance.
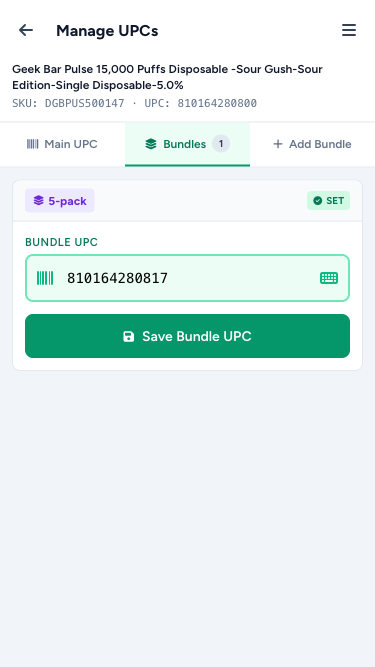
Each bundle (5-pack, carton, case) is its own card with the pack size pill, the pack SKU when set, and a status badge — green SET if the barcode is in place or red NO UPC if it's missing. One Save button per card so you can fix barcodes one at a time without scrolling around.
The Add Bundle tab takes you through the three fields needed to create a new pack variant: units per pack, pack SKU (optional), pack UPC (optional). All three use the same scan-friendly inputs.
When you save from this page, the system drops you back into Move Product right where you left off — the same product still selected, the same bins still listed.
PO Receive Notifications: Less Noise
When you mark a Purchase Order as partially received, the Slack message and the receive-confirmation email used to list every product on the PO — including the ones with 0 units received. The lists got long and the actual receives got buried.
Now both notifications only include products that were actually received. The line count and total units in the footer reflect the filtered list so the summary matches the body. The Purchase Order page itself still shows the full ordered list — that's the source of truth for what was ordered vs received.